Printing on Installed Decorative Panels: What to Assess Before Choosing a Wall Printer
Published · PRO TECHnology Digital Printing
Some of the most useful wall printing work is not on a plain wall at all, but on panels already fixed in place: layered, framed or studded with raised details. Here is what to check before relying on a vertical printer for that work.
A vertical wall printer can print a decorative panel where it hangs: the panel does not come down for a flatbed, and no vinyl goes over it. Whether a particular panel suits that depends on five things: the access around it, the depth of its relief, how the printer manages the distance to its print head, the surface finish, and where the artwork has to sit. This guide takes each in turn, using the figures wallPen publishes for the wallPen E2 and a recent job by our sister company Sun Studio Dubai as the example.
- Laser sensing
- Up to 10 cm of wall irregularity detected in real time, the print head adjusting as it prints (wallPen).
- Texture depth
- Textured surfaces generally print up to a contour depth of about 10 mm (wallPen).
- Protruding details
- No published figure. Plan artwork around them, and test anything that must cross them.
- Edge margins
- About 6 cm left, 10 cm right, 25 cm top and bottom, near adjacent walls, floor and ceiling.
- Set-up height
- 1.7 m minimum; the standard axis reaches 2.4 m, the extension set 4 m.
- Floor
- Integrated floor levelling; rails recommended on uneven floors, not strictly required.
- Light on dark
- Needs white ink, an optional channel on the wallPen E2.
- Real example
- Names printed in place on an installed museum map panel in Dubai, by Sun Studio Dubai.
Key takeaways
- An installed decorative panel can be printed in place with a vertical wall printer, so it does not have to come down for a flatbed or be covered with vinyl.
- Two published wallPen figures are often confused: the laser follows up to 10 cm of wall irregularity, while textured surfaces print to a contour depth of about 10 mm.
- wallPen publishes no figure for printing across protruding objects, so lettering is planned on flat areas and anything that must cross a raised detail is tested first.
- Access decides the printable area: floor space for the machine and rails, the set-up height, and margins of about 6 to 25 cm near adjacent walls, floor and ceiling.
- The finish decides adhesion: a test patch on the same finish, cured and tape tested, comes before the job is promised.
- Light lettering on a dark or coloured panel needs white ink.
Why are installed decorative panels a different kind of job?
Decorative panels in museums, lobbies, showrooms and offices are usually printed before they are fixed, while they are still flat sheets that fit a flatbed. Adding lettering or graphics once a panel is on the wall leaves two familiar routes: take the panel down, print it and reinstall it, or apply cut vinyl or a printed film over it.
A vertical wall printer adds a third route. It stands on the floor in front of the panel and prints the surface as it is, so nothing is removed and nothing is applied over the finish. That suits interiors where a panel cannot easily come down, or where the client will not accept a film edge. The cost of removal and reinstallation is weighed in our look at the full cycle cost of wall graphics; this guide is about whether a given panel can be printed at all.
A recent example: country and city names on a museum map panel
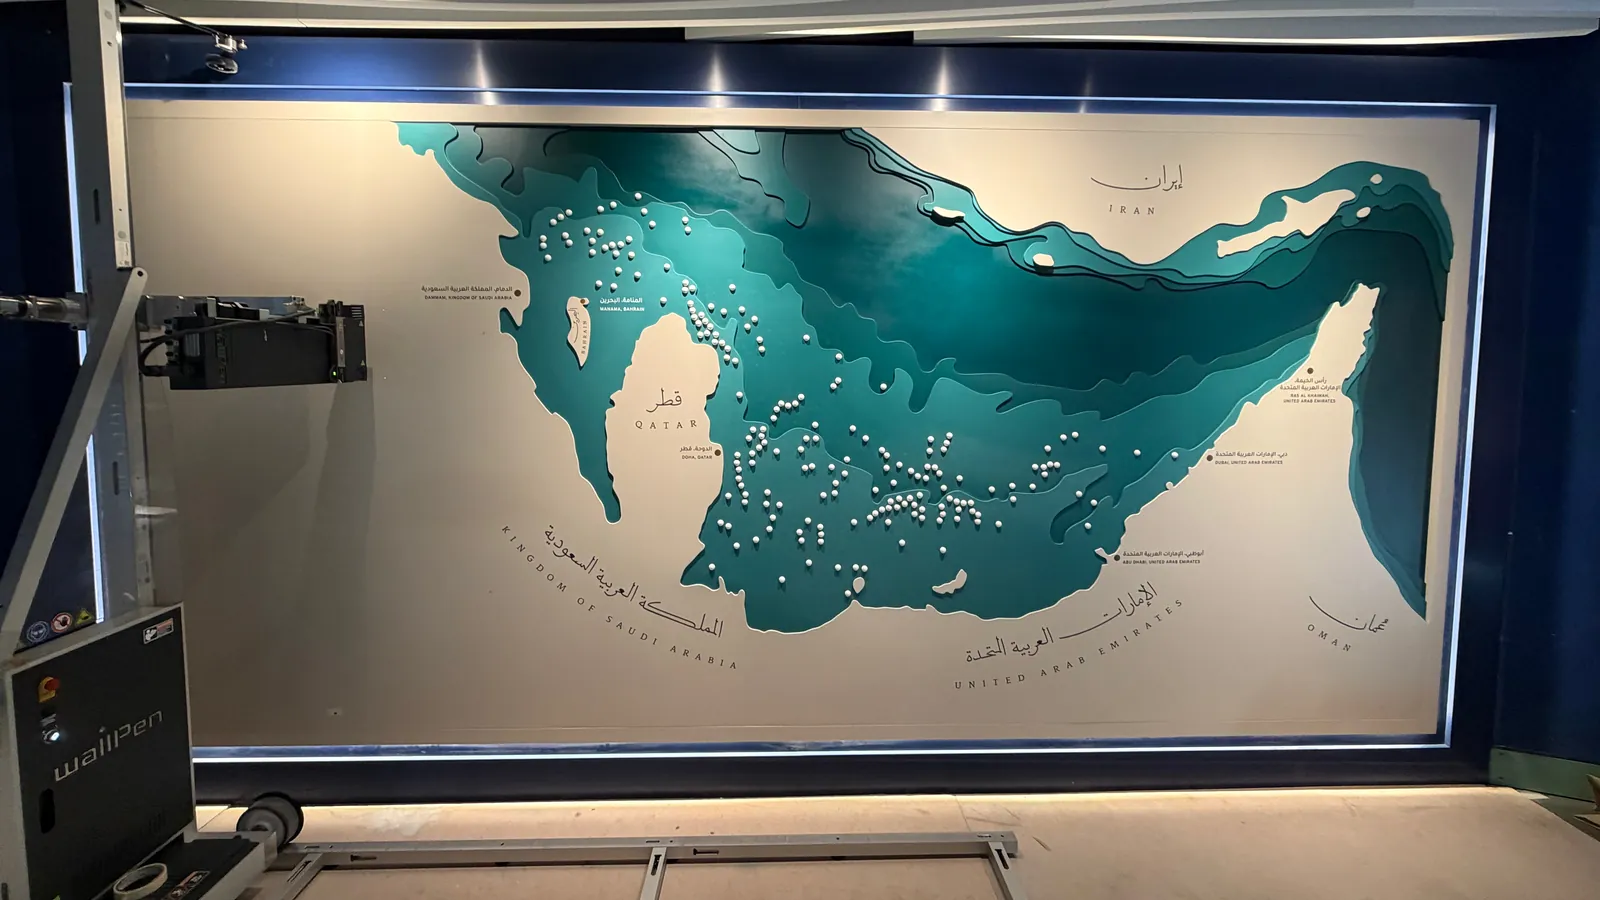
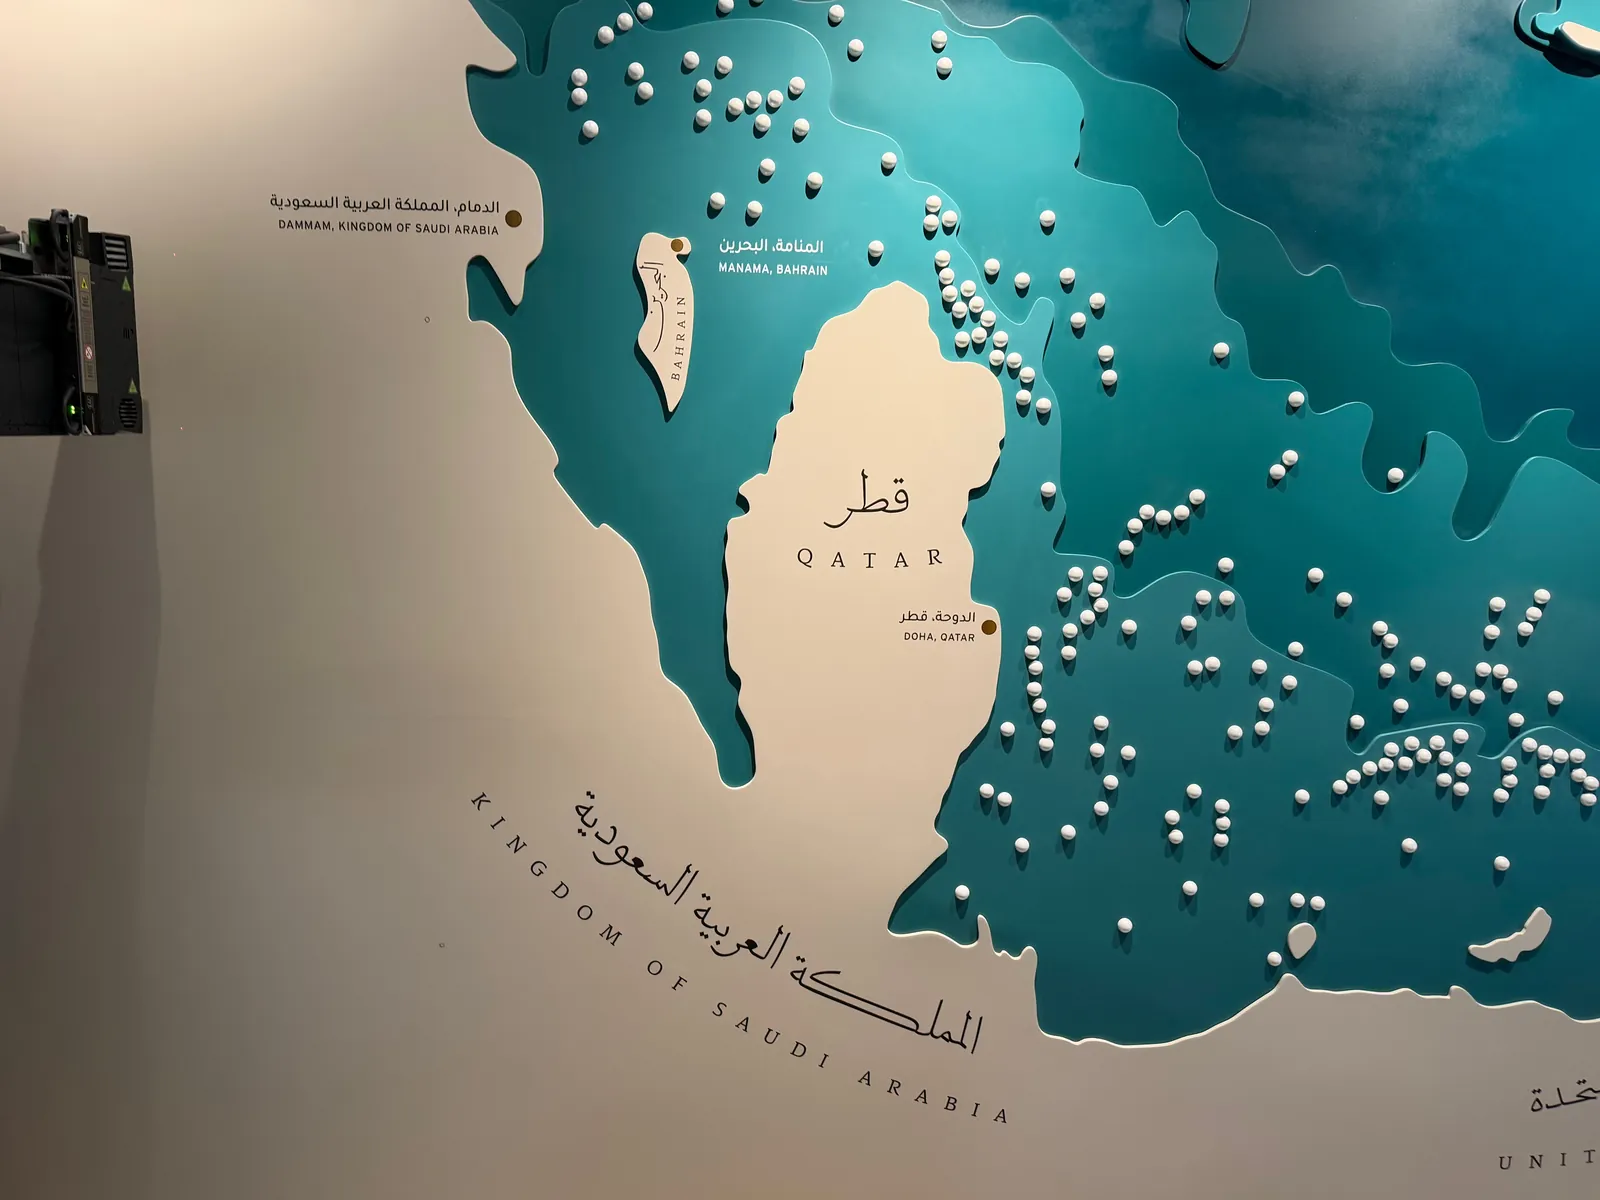
Sun Studio Dubai, our sister company in the PRO TECHnology group, recently printed country and city names onto a decorative map panel in a museum under development on the ground floor at Emirates NBD’s Dubai head office. The panel was already fixed in position. It is built up in layers, with protruding pearl-like spheres, and the client did not want vinyl or stickers in the interior.
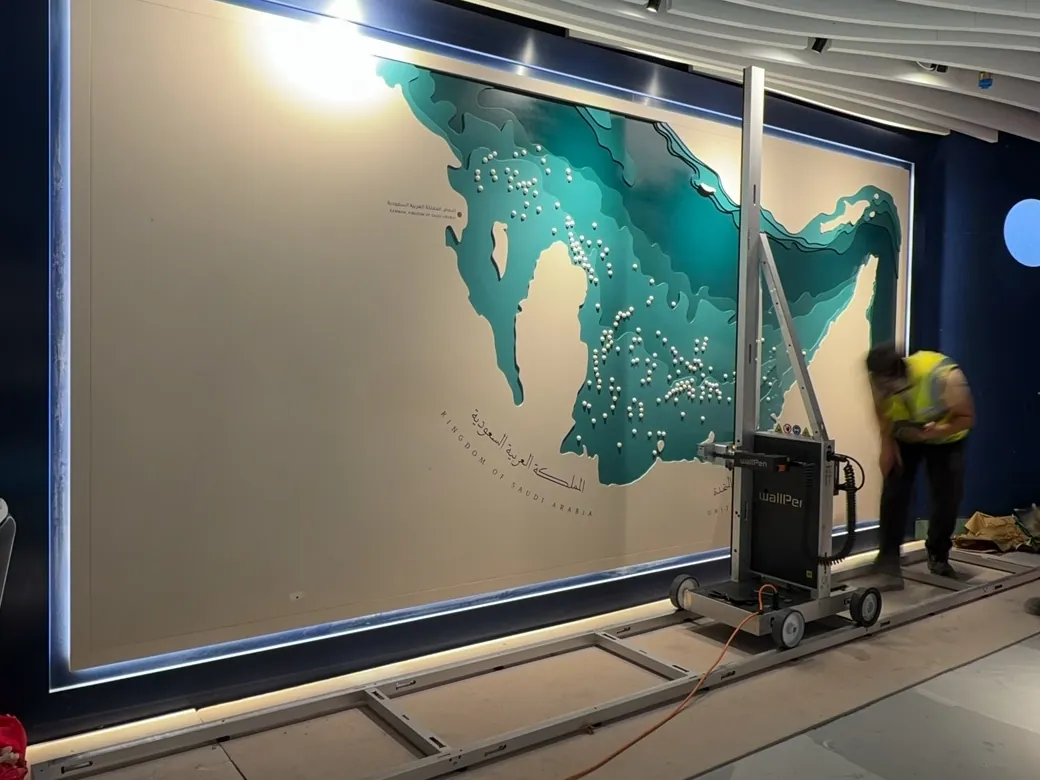
With the panel installed, a flatbed was impractical, so the names were printed in place with a wallPen E2 standing on floor rails in front of the panel. Its laser sensing helped manage the print head’s distance as the surface changed from one layer to the next. Every name was placed in an open area of the map rather than across the spheres, and the one label on the dark teal layer was printed in white. Photographs and the full account are in Sun Studio’s case study of the museum panel.
Uneven or in relief? The two figures buyers mix up
wallPen publishes two numbers that sound alike and mean different things. The first concerns the surface as a whole: its laser sensors detect irregularities of up to 10 cm in real time, and the print head adjusts to the surface while it prints. That covers a wall or panel that bows, leans or steps gently across its width.
The second concerns texture inside the printed area: natural stone, clinker or textured plaster can generally be printed up to a surface contour depth of about 10 mm. That is a tenth of the first figure, and it is the one that decides whether fine detail survives on a rough or carved face.
A layered decorative panel sits between the two. Each layer may be flat, but the step from one layer to the next, or a stud, pearl or moulding standing proud of the face, is a sudden change rather than a gentle one. wallPen does not publish a figure for printing across protruding objects, so treat a stepped or studded panel as a case for a test print, not for a specification sheet.
What to measure on the panel
- How far each layer, stud or moulding stands out from the face behind it, at its deepest point.
- Where the flat areas are, and whether the artwork can sit entirely on them.
- How the whole panel lies: in plane, leaning, bowed or curved across its width.
- The texture of the finish where the artwork will sit, against the 10 mm guide.
Access and clearance around an installed panel
The printer stands in front of the panel, so the floor matters as much as the panel. Allow clear floor space along the full printed width for the machine and, ideally, its rails. wallPen fits an integrated floor-levelling system and recommends rails on uneven floors without making them compulsory. A raised plinth, a step, fixed furniture or a display case in front of the panel can rule a job out before the surface is even considered.
Height and edges come next. The minimum set-up height is 1.7 m, the standard vertical axis covers 1.7 to 2.4 m, and the extension set reaches 4 m. Near adjacent walls, the floor and the ceiling there are margins the inkjet heads cannot reach: about 6 cm on the left, 10 cm on the right and 25 cm at the top and bottom. A panel set into a recess, close to a ceiling or with lighting fixed just above it can lose part of its printable area to those margins, so check where the artwork sits relative to every obstruction.
On a curved panel, the motor-driven steering in the front axle lets the machine follow the curve. A tight radius or a compound curve still needs assessing on site.
Site checklist
- Clear floor space along the printed width, and whether rails can be laid.
- The height from the floor to the top of the artwork.
- The distance from the artwork to adjacent walls, the ceiling, lighting and fixtures.
- A standard socket nearby: the machine runs on 100 to 250 volts and draws about 200 watts while printing.
- Ventilation, if the room stays occupied during printing.
Will the panel’s finish take the ink?
The panel’s material often matters less than its finish. wallPen lists plaster, wallpaper, wood, brick, latex paint, stone, clinker, plastic, metal, glass and most tiles among the surfaces its UV ink prints, often without issues. Decorative panels bring finishes of their own: lacquers, laminates, powder coats and specialist paints, some made to resist marks, which can also resist ink.
So the test comes before the promise. Print a small patch on the panel in a hidden spot, or on an offcut with the same finish, let it cure and tape test it, as set out in our UV printing adhesion guide. Glass and some coated surfaces need a primer or pre-treatment, and the test shows whether this one does.
Colour needs the same thought. UV inks are transparent, so lettering lighter than the panel behind it has to be printed with white ink, which is an optional channel on the wallPen E2. On the museum panel above, the label on the dark teal layer was printed in white and the rest in black.
Planning the artwork and the day on site
Build the artwork from the panel, not from the design drawing alone. Measure the panel, photograph it square-on, and place every word or graphic on a flat area, clear of studs, steps and edges, in a file set up at real size. Confirm the positions against the panel itself before printing, because installation tolerances can move a panel away from its drawing.
Then plan the time. wallPen states that one person can have the machine ready to use in under 30 minutes, and its FAQ gives about 2 to 3 m² an hour as the practical speed for good quality. On a lettering job the printed area is small, so positioning, test prints and moving the machine between areas are likely to take more of the day than the printing itself.
Fit-out sequencing matters too: the panel’s finish must be fully cured before printing, and the floor in front of it has to stay free of other trades for the duration. File preparation for wall printers in general is covered in our guide for new wall printing businesses.
Questions to ask before relying on a wall printer for relief surfaces
Whichever machine you consider, put the same questions to the supplier, and ask for the answers in writing:
- How does the machine measure its distance to the surface, and over what range does it compensate?
- What contour depth does the maker publish for textured surfaces, separately from that range?
- Is there any published figure for printing across protruding objects, and what happens if the print head meets one?
- What are the margins near adjacent walls, the floor and the ceiling, and the minimum and maximum set-up heights?
- Is white ink available for light lettering on dark or coloured finishes?
- Will the supplier run a test print on your own panel finish before you commit?
- Who installs the machine, trains the operator and supplies parts locally?
For a full comparison of wall printing machines, including how wallPen answers each check, see our wall printer comparison guide. With a wallPen supplied by PRO TECHnology, installation and operator training come from the six engineers of our Digital Printing division.
Frequently asked questions
Can a wall printer print over raised details on a decorative panel?
wallPen publishes no figure for printing across protruding objects. Its published figures are up to 10 cm of wall irregularity, which the laser sensors follow, and a contour depth of about 10 mm on textured surfaces. Plan artwork on the flat areas between raised details, and test anything that has to cross them.
What is the difference between the 10 cm and 10 mm wallPen figures?
The 10 cm figure is how much irregularity across a surface the laser sensors detect and the print head follows, such as a bow or a lean. The 10 mm figure is the surface contour depth wallPen gives for textured surfaces such as stone or textured plaster. A deeply carved or studded face is closer to the second limit than the first.
Does an installed panel have to be removed before it is printed?
No. A vertical wall printer stands on the floor in front of the panel and prints it in place, as long as there is clear floor space along it and the artwork sits clear of the margins near adjacent walls, the floor and the ceiling.
Are rails needed to print a panel in a finished interior?
Not always. wallPen fits an integrated floor-levelling system and describes rails as recommended rather than strictly required, mainly to compensate for uneven floors. On a finished floor, protect it before the machine and rails go down.
Should a decorative panel finish be tested before printing?
Yes. Print a small patch on the panel in a hidden spot, or on an offcut with the same finish, let it cure and tape test it. Lacquered, laminated and coated finishes vary, and the test shows whether a primer or pre-treatment is needed.
الطباعة على الألواح الزخرفية المركّبة: ما الذي يجب تقييمه قبل اختيار طابعة الجدران
تستطيع طابعة الجدران العمودية أن تطبع على لوح زخرفي مثبّت في مكانه، من دون فكّه لطباعته على طابعة مسطحة، ومن دون لصق فينيل فوقه. ويتوقف ذلك على المساحة المتاحة أمام اللوح، وعمق البروز في سطحه، وطريقة ضبط المسافة بين رأس الطباعة والسطح، ونوع التشطيب، وموضع التصميم على اللوح.
تنشر شركة wallPen رقمين مختلفين: فحساسات الليزر ترصد عدم استواء السطح حتى 10 سم لحظياً ويتكيّف رأس الطباعة معه أثناء العمل، أما الأسطح ذات الملمس فتُطبع عادةً حتى عمق يقارب 10 مم. ولا تنشر الشركة رقماً للطباعة فوق العناصر البارزة، لذلك نخطط التصميم على المساحات المسطحة ونختبر أي جزء يمر فوق البروز.
مثال حديث: طبعت شركتنا الشقيقة صن ستوديو دبي أسماء الدول والمدن على لوح خريطة مركّب في متحف قيد التطوير بالمقر الرئيسي لبنك الإمارات دبي الوطني في دبي، بطابعة wallPen E2 على سكك أرضية. والتفاصيل والصور في دراسة حالة لوح المتحف.
احجز عرضاً للطابعة في صن ستوديو بمنطقة القوز في دبي، وأحضر قطعة بتشطيب ألواحك نفسه لنطبع عليها اختباراً.
Sources
wallPen's FAQ and technology pages were read on 11 October 2026. The museum panel details come from Sun Studio Dubai's project record and photographs of 10 October 2026.
Test your panel finish before you plan the job
Book a demonstration at Sun Studio in Al Quoz, Dubai, to watch a wallPen print, and bring an offcut with the same finish as your panels so it can be test printed.